Monthly Archives: October 2010

Checking out Windows 7 Service Pack 1 Release Candidate

Back in early July, Microsoft released the first beta for its first major maintenance update for Windows 7 called Service Pack 1. To be honest, major is kind of a loaded word since there is not much to see on the client side of things. What you should expect is a collection of all updates that have been released for Windows 7 since the OS went to manufacturing July 22nd 2009. I decided to try out the RC to see what’s new, but there wasn’t really anything new at all, I did notice that the installation took longer than the beta, approximately 2 hours. The offline installer was used for the installation, since my Internet connection is unreliable and I have a few machines to update, if I need to reinstall Windows 7 RTM for some unknown reason, I don’t have to download every single update for the machine. I have managed to work around even such a situation by keeping recent in tip-top shape system images of my system to avoid doing such as thing. System Imaging is now included in all editions of Windows 7 and I find it very handy and convenient. 

I loaded Service Pack 1 on a Acer laptop with the following specs:

AMD 2 GHZ Turion x2
4 GB of RAM
ATI Mobility Radeon 256 MBs of vRAM
160 GB hard disk

So what’s changed?

Nothing of significance, the setup screen displays a 2011 Copyright instead of 2010 in the initial beta and as I noted early, it takes much longer to install, based on my experience on this particular system. The update was applied to a production Windows 7 Ultimate 64 bit RTM system last updated in June of 2010. One welcome change that has been introduced is the SP no longer require that I remove Microsoft Security Essentials before proceeding with installation.

Windows 7 SP1 beta – Copyright 2010


Windows 7 SP1 RC – Copyright 2011

Installation

Preparing installation


After the installation is complete, your computer will go through a series of restarts and that’s it! My applications and devices are functioning just fine so expect a smooth experience, although its still pre-release software, so if you discover an issue, definitely send it in. If you are using Windows Server 2008 R2 though, which is Microsoft’s Network Operating system, you will see significant new features and functionality such as a Dynamic Memory Manager and Remote FX. Microsoft has not provided any information about when the final release will be available but rumor say it should be here in Q1 2011, but I would like to implore again, a lot of what you will see in SP1 is already available to you through Windows Update. Windows 7 RTM today is a great release, so if you have not upgraded to it, its definitely the right time.

If you would like to try out Windows 7 Service Pack 1, you can download it here
Windows Team Blog: Windows 7 & Windows Server 2008 R2 SP1 Release Candidate

Previously
Introducing Windows 7 Service Pack 1 (BETA)

Leave a comment

Filed under 7 Journal

Using Windows Updates – Managing, Configuring and Troubleshooting

A couple weeks ago Microsoft released a healthy dose of updates for our Windows systems. Not everyone will welcome this with joy, since Windows Updates, although a very important part of your PC health, can interrupt your workflow when you least expect it. With the release of Windows Vista, Microsoft introduced major changes to its servicing and maintenance infrastructure. Windows XP and prior versions of Windows utilized the Windows Update Service page to manage and download the latest updates. Although updates can be downloaded automatically without any intervention since it is automatically set to do so, you might prefer to do so at a time more convenient for you.

In Windows 7, there are some small improvements, mostly visual, the main Windows Update page displays a large banner with quick information such as the amount of available and optional updates, in addition to information such as the total size of the updates. Updates can be reviewed and downloaded immediately. One of the nice features of Windows Update is, it now allows you to set any user privilege to download updates without the need for Administrator rights. If you are still running Windows Vista, you can also benefit from the new Windows Update experience, the Microsoft Update Team enabled support for Windows 7’s predecessor as you can see in the above screenshot.

You can now setup Windows Update for any user privilege

Windows Update is more organized and easier to navigate compared to the previous iteration, in Windows XP, you could only view updates through the web browser. You can view updates offline, updates are better organized too, for instance, updates are categorized whether it be an update that protects your computer from a vulnerability, adds stability, while Optional Updates provide features that are not necessarily needed, but can add functionality. Microsoft has added a Details Pane on the right of the Windows Update Explorer. When you click on an update it provides a description of the update such as the associated application or component with links to additional information.

Configure Windows Updates

As I noted earlier, installing updates can happen at the most inopportune time. For instance, you might leave your PC on overnight for whatever reason, whether you are downloading something or you are running a mission critical program. Windows Update by default does not realize this although Microsoft has refined the behaviour since the release of Vista with a Windows Update Notification dialog that gives you the option of delaying a restart needed to configure updates. This is of course is only when you are wide awake in front of your PC.

For persons who are away from the PC, here is what you do. Click Start, type: Windows Update

Hit Enter key on your keyboard

Click the Change settings link

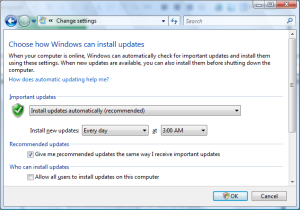
Under the Important Updates heading, click in the list box

Select the option, Download updates, but let me choose when to install them.

Side note for users running Windows XP, you can also do this by clicking Start, right click Computer > click Properties > Automatic Updates (tab). 

 Troubleshooting Updates

There are hundreds of millions of PC’s out there with a variety of configurations, this makes it very complex to ensure that all machines can be updated and Microsoft has done an excellent job at doing so. There are times though when updates can be a problem, whether it is installing, configuring or even trying to obtain the latest updates. If you do encounter problems downloading or installing a update, there are certain factors that might be involved, here are some tips to help with resolving such problems:

Download and install the update manually – Although you can download Windows Updates through the Updates explorer they can also be obtained from http://www.microsoft.com/downloads All you need is the KB number and a simple search of the site, download the update and install manually.

Disable your Antivirus utility temporarily – Certain Antivirus utilities are very sensitive and are designed to detect the slightest changes that are being made to the system, whether its updating system files or making changes to the Windows Security configuration. The Antivirus might think it is doing the right thing by preventing that update from going any further. So, disabling it temporarily while the updates are installing is always recommended, but always remember to re-enable after doing so.

Make sure your date and time are correct – This is another gotcha for users, your date and time might be incorrect, which could be why you are not seeing the latest updates or why they are refusing to install correctly. Make sure your date and time are correct. You should also check the BIOS to make sure it is generating correct date and time. If it is not doing that every time you start your computer, it means the CMOS battery is dying or defective and needs to be replaced. You can do yourself, its quick and easy and the chip cost about US $1. If you are not comfortable doing it yourself, take your computer to a PC Servicing shop and let them do it for you.

Other suggestions

1. Download & manually install the System Update Readiness Tool for Windows 7 (KB947821) [August 2010] Validation Required

Tip: Save the download to your desktop then run the installer. Follow all prompts.

2. Reboot, if not prompted to do so.

3. Open Internet Explorer (only) to http://support.microsoft.com/kb/971058 & run the Fix It in DEFAULT and then AGGRESSIVE modes. [1]

4. Reboot & test by running a manual check for updates per…

   How can I tell if my computer is up to date?
http://windows.microsoft.com/en-us/windows7/How-can-I-tell-if-my-computer-is-up-to-date

Credit: Microsoft MVP PA Bear

Removing a problematic update

What I have discovered over the past few years is, not because an update is offered through Windows Update means you need to install it. If you happen to install an update that is causing your system to not function properly, you can uninstall it. Simply click Start, type: View Installed Updates

Hit Enter key on your keyboard

Scroll down and look for the update that is causing problems, select it, right click it and then click Uninstall and Restart your system.

If you know that this update is problematic and your system functions just fine without it, you can hide the update, open the Windows Updates Explorer. Select the update that is listed, right click it and click the Hide menu. From now on, the update will not appear any more or install with other updates. If you believe that this is an update you might need to install, but you discover that it is problematic, well, it depends, if its a driver for instance, that means its provided by a third party, such as a video driver update or an update for your wireless adapter. My suggestion is to check the manufacturers website and download the latest driver from there or consult the developers support options to find out what is the best measure you should take in regards to updating that particular driver.

Troubleshoot Windows Update

Open  Control Panel, in the  View By  menu (top/right) select one of the  icon views.

Click Troubleshooting. On the bottom of the screen, under  System and Security, select the  Fix problems with Windows Update troubleshooter. Follow the instructions.

You can also check the information in the following article.

Troubleshoot problems with installing updates
http://windows.microsoft.com/en-us/windows7/Troubleshoot-problems-with-installing-updates

Still giving problems?

If Windows Update still continues to give problems after trying all the above solutions, then it probably means Windows Update is corrupted and needs to be fixed. Please see the following links about resetting Windows Update components:

Reset Windows Update Components:
http://support.microsoft.com/kb/971058
http://support.microsoft.com/kb/883825

Then run the System File Checker utility:

Click Start
Type: CMD, from the results, right click CMD
Click ‘Run as administrator’
At the Command Prompt, type: sfc/scannow

This will check for any integrity violations

Restart your system

Also, try reviewing the Windows Updates and install them in batches. For example, if you see 35 updates are available for download, don’t download and install all 35 updates one time. Look at the smallest updates that range in KB’s and install those first then restart your system. Do another 5, avoid hardware updates first along with .NET Framework updates, I notice these can affect how long updates take to install and configure on shutdown.

If Windows Update problems continue to persist, then its time to get your hands dirty.

Rename the Software Distribution folder. (Because of possible folder corruption or other errors.)
Click Start, type services.msc.
Click OK.

Right-click the Automatic Updates service.
Click Stop.
Stopping the service will take a moment.

Rename the “SoftwareDistribution” folder:
a. Click Start, click Run, type %systemroot%, and then click OK.
b. Right-click the SoftwareDistribution folder, and then click Rename.
c. Type SoftwareDistribution.old, and then press ENTER to rename this folder.
Create a new folder called "SoftwareDistribution"
Click Start. Choose Run.
In the Run box, type services.msc.
Click OK.
Right-click the Automatic Updates service.

Restart your system and try updating your system again.

Can I backup updates?

Well, no, but you can download updates manually from the Microsoft Downloads Center. Of course, individually the hundreds of updates that have been released for Office and Windows would be a nightmare to install. For Windows 7 in particular which still does not have a production release of Service Pack 1, if you do a clean install of the RTM, you will have to download all updates. The next best option is to download the Microsoft Security Updates .ISO images for each month, its not really an effective solution either, since they are quite large and contains updates not only for Windows 7, but all versions Windows, their architectures (32 and 64 bit) and various editions of Windows 7, Vista and XP. To learn more about the latest Security Bulletins available, please click the following link:

http://www.microsoft.com/technet/security

To learn more about Microsoft Security Release ISO images, click the following link:

Security updates are available on ISO-9660 DVD5 image


Leave a comment

Filed under 7 Journal

You can now Pin Hotmail on your Windows 7 Taskbar!

Last month Microsoft launched the innovative next generation version of its popular browser, Internet Explorer 9. One of the major highlights is the app centric experience IE 9 introduces. This makes it easy to access your favorite websites in Windows much easier while also providing unique co-branded experiences. The Windows Live Team are updating their various web properties and services to take advantage of all of Internet Explorer 9’s cool features.

Windows Live Hotmail wave 4 now lets you not only pin to the Taskbar, but quickly access aspects of the service through a Windows 7 Jumplist. Tasks you can access include your Windows Live Home Page, Inbox, Calendar, Contacts and Send Mail.

Just as a reminder, if you don’t know how to create a pin icon, simply hold down your left mouse button the icon for the URL in the Address Bar. Then drag it to the Windows 7 Taskbar.

…and release, voila! Its that simple

When you click the shortcut, you will now see a lovely Co-branded Windows Live Hotmail wave 4 experience:

Windows Live Hotmail and Internet Explorer 9 integration

Resources
Download Internet Explorer 9 here
Enjoying the Beauty of the Web with Internet Explorer 9
Windows Live Hotmail


Leave a comment

Filed under 7 Journal

Create a Signature Windows 7 PC

I read/watched an interesting blog entry by Ben Rudolf of the Windows Team Blog about an option customers have at the Microsoft Store to have their PC’s customized and optimized with Windows 7 and just the essentials installed called the Microsoft Signature. One of the things I have noticed over the past 3 years is the cut down of trialware that is included with most new PC purchases. A Dell Inspiron a friend received for back to school, included a small bundle of programs most users out of the box can immediately take advantage of. To get your PC configured this way, it must be purchased from the Microsoft Store, if you purchase your computer from another retailer, you will need to take it into your nearest Microsoft Store and have them configure it for you. One of things users don’t like about OEM Windows installations is the trialware is often integrated with the recovery media, so even if you attempt to do a clean install, you are basically going to reinstall the same programs you are trying to remove.

…you can get Microsoft Signature on any PC purchased from the Microsoft Store.  But what if you buy a PC somewhere else, but want the Signature Experience?  That’s where the other half of Signature – Microsoft Signature Upgrade – comes in to play.  If you live near a store, you can bring in any Windows 7 compatible PC and the Store techs will do a clean install of Windows 7 (you’ll need to buy a full retail copy, of course), migrate all of your data, and then apply the Signature configuration to it (i.e., set it up almost exactly like a Microsoft Store-bought PC).  It’s a great way to make your PC experience even better.

Lear more here

If you don’t have the option of visiting a Microsoft store or don’t live near one, here is a more cost effective method, create your own Signature Windows 7 PC!

Folks, here is what you do, if you get a Windows 7 PC with unwanted trial software, all you need to do is the following:


Click Start, type: Programs and Features


Press the Enter key on your keyboard


Spend a few minutes looking through the library of software installed

Select the programs you don’t want to have installed, then click ‘Change/Uninstall’ button on the Command Bar and follow the on screen wizard to uninstall it.

Repeat this process for other programs.

Once you have uninstalled the applications you don’t need, restart your system.
Click Start, type Disk Cleanup
Run disk clean up on the drive on which Windows 7 is installed.
For details on what you should delete and remove, please review the following article I authored about how to speed up your Windows 7 system:
http://adacosta.spaces.live.com/blog/cns!E8E5CC039D51E3DB!40406.entry

After that is complete, restart your system, then download those programs in Ben’s post that Microsoft loads on a Signature PC:

Recommendation, download all these programs first before you start any installation.

Install in the following order to reduce the number of restarts you will need to do, (also remember to close your web browser window and any applications you might have open):
Microsoft Security Essentials > Adobe Flash Player > Microsoft Silverlight > Zune Software > Windows Live Essentials > Adobe Reader.

(Please note, if your computer came with an Antivirus utility installed such as a trial version or you installed one yourself, uninstall it before installing Microsoft Security Essentials to avoid any conflicts.

Now for optimizations, one of the great things about Windows 7 is, you can uninstall components that come with Windows you don’t need, although I personally use most of the bundled programs that are included in Windows 7, but if there is a program you don’t need, you can disable it, the following article will show you how:
http://www.notebooks.com/2009/10/26/how-to-customize-your-windows-7-installation/

Once you have done that, here is a very important recommendation, create a backup of your Windows 7 installation. With the release of Windows 7, all editions now include system imaging. What this does is create a backup replica of your actual Windows 7 installation. An essential part of doing this is having an external hard disk which are pretty cheap these days with enough storage to store the backup. So if you have a 500 GB internal hard disk for example, its recommended you get at least a 750 GB to a 1 TB USB external hard disk. You should take into account future growth such as installation of applications, creation of personal files such as photos and videos over time. Once you have obtained the external hard disk, simply connect it to your computer, turn it on and open Backup and Restore Center (Click Start, type: Backup and Restore Center), press Enter on your keyboard. You can get more details at the following link:
http://www.notebooks.com/2009/10/24/how-to-backup-your-installation-of-windows-7/

Here is a cool trick, you can store multiple image backups of your Windows 7 installation on the external hard disk for extra backup purposes. Click Start, right click Computer, click Properties, under ‘Computer name, domain, and workgroup settings’, you will see the present workgroup name, you can do the initial backup with this name, but if you create a future backup, it will overwrite any changes to the backup on the external disk you might make in the future. A work around for this is to click ‘Change settings’, under ‘Computer name’ under ‘To rename this computer or change its domain or workgroup, click Change’, click ‘Change’ button, enter a new name, call it ‘Safe Backup’

Click Apply, then ‘OK’

Restart the machine if prompted. Go ahead and do the backup to the external hard disk. Follow the same procedure, change the name again to something else as to avoid overwriting that signature backup we just created.

The benefit is, suppose you want to refresh your Windows installation in the future? All you need to do is simply, backup any recent accumulated data you might have created since that first ‘Safe Backup’ using Windows Easy Transfer to the same External Hard disk, you should create a .MIG file, the following article will show you how:
http://www.notebooks.com/2009/10/07/using-windows-easy-transfer-in-windows-7/

Go ahead and restore the ‘Safe Backup’ image we created the first time we got our new PC, the following article will show you how to do the restoration:
http://www.notebooks.com/2009/10/24/how-to-backup-your-installation-of-windows-7/

Once that is done, simply, launch Windows Easy Transfer in Windows 7, connect the external hard disk, follow the on screen wizard and point to where-ever you stored the .MIG file on the external hard disk and proceed to restore your personal files and settings, follow the Windows Easy Transfer report to reinstall any applications that you might installed on your system since you last updated the System Image we first created (aka ‘Safe Backup’)

There you go, no need to request OEM media and at the same time you are learning how to take charge of your own Windows 7 PC. For some novices or intermediate users, going to the Microsoft store might still be best if you are not comfortable with these suggestions I provided. The beauty of the Windows ecosystem is, you might just know a trusted family or friend that can guide you through this process.


2 Comments

Filed under 7 Journal